Easy installation process:
Get 60% better thermal
and sound Insulation.
WATCH THE FULL PROCESS TO INSTALL LOOSE FILL WL-5825.
At WOOL LIFE, we value efficiency, sustainability, health and comfort. That’s why we designed our easy to install, high performance WL 5825 van insulation.
Sit back and enjoy this video that shows all the steps for an efficient installation.
Tools for a Perfect Install
Leaf Vacuum/Blower
You can easily blow in the wool with any leaf blower that has the vacuum/mulch setting. With that said, here is our favorite blower for price, power, and ease of adaptability.
Hose
A shop vac hose is perfect for coupling with the leaf blower. Here is a nice option with a 13’ lead.
Staple Gun or Hot Glue Gun
If you are furring out your van with wood, then you will want to secure the mesh to your studs with a staple gun. This can be with a hammer tacker style stapler, or with a pneumatic staple gun and air compressor. For adhering the mesh to metal van framing, use self tapping screws or a hot glue gun. If you go the glue gun route, we recommend these high quality glue sticks.
Enjoy your VAN for many years to come
Warranty
We offer a 30 year warranty, even though some places like Buckingham Palace have maintained wool installed in good condition for over 200 years.
It is safe to say that the long-lasting performance of our insulation will far outlive the van it is installed in.
If you are not satisfied with the product you will get your money back with no questions asked.
How Much Wool You Need
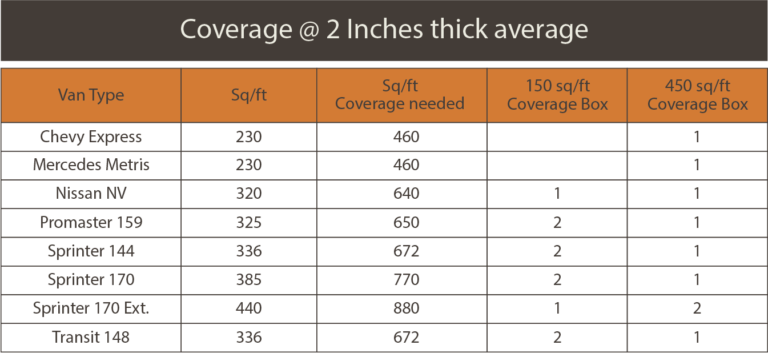
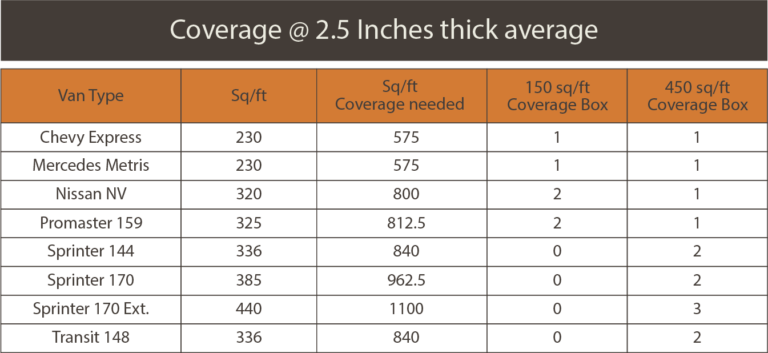
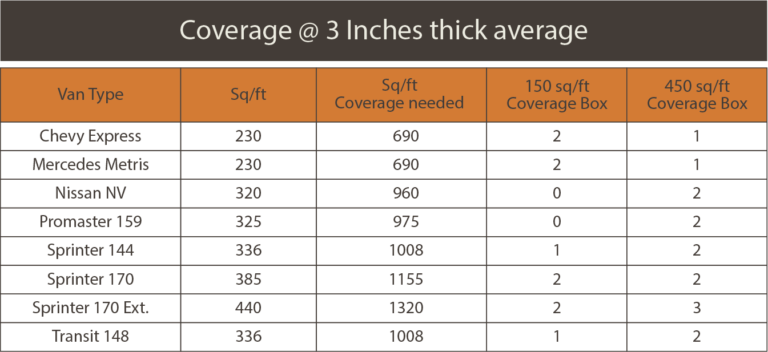
Most vans have about a 2-inch cavity depth that you can fill with insulation. If you are securing the mesh right against the van’s metal framing, then a 2-inch covering will do nicely. If you are framing it out a bit with wood, then you can figure for a 2.23” to 2.7” coverage — this also will ensure that you have enough wool to fill gaps in the doors and other hard to reach places. Filling in those pockets will keep your van from sounding tinny and rattly and give you a solid, tight sound and feel.
Here is a chart to give you an idea of how much wool you will need.


If you have a van model that’s not on the chart,, use this formula to calculate how much you need:
[150 ft box] 1 box will cover 150 sq/ft at 1 inch thick
[450 ft box] 1 box will cover 450 sq/ft at 1 inch thick
Measure your walls, floor, and ceiling to get your square footage.
If you have 300 sq/ft in your van, and you didn’t add a lot of framing, you can go with 2 inches of insulation on average. You would need 300sq/ft x 2 inches = 600.
You will want to match that 600 as close as you can, so that would be 1 [450 ft box] and 1 [150 ft box], to fill all you need.
Then you’re good to go!
Insulate all shapes in your VAN’s cavities and gaps
Wall cavities in vans are 2 inches on average, but in many areas they are deeper (up to 4.5 inches). Loose fill knops will completely fill those uneven cavities providing an even higher R-value.
Our patented manufacturing process makes a well-formed Wool Knop (insulknop 5825) that is completely resistant to road bumps and vibration.
Basically, it’s designed to put up with life on the road and all the bumps that come with it.
It doesn’t compress, settle, or slump like other insulations, and it will retain its thermal and acoustic value for 50 years.

